Skip to content
- From any Customer Level screen, click the Services tab in the Main Menu.
- Click E911 Locations in the side menu.
- On the E911 Locations screen, click New Location.
- Enter the physical Address (must match USPS format; use the USPS ZIP Code utility if needed: https://tools.usps.com/go/ZipLookupAction_input).
- In the Phone Number box, select one (and only one) number to associate.
- Scroll to Associate With Phones and check each extension that will use this location.
- Check I agree to the Terms and Conditions (required).
- Click Save.
- From any Customer Level screen, click Services > E911 Locations.
- On the E911 Locations screen, click an address in the list.
- On the detail screen, modify the Address and Associate With Phones sections as needed.
- Check I agree to the Terms and Conditions (required).
- Click Save.
- Navigate to Services > E911 Locations.
- Enter any part of an address in the Search box.
- Click Search to display matching results.
- To clear results, click × in the Search box.
- Go to Services > E911 Locations.
- Click the address of the location you want to delete.
- On the detail screen, check I agree to the Terms and Conditions (required).
- Click Delete.
- In the Delete E911 Location? dialog, select another location from the dropdown to reassign the phone number.
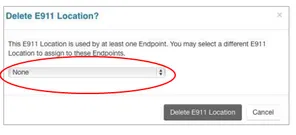
- Click Delete E911 Location to confirm.